
Buffalo Wings Recipe: 5 Easy Tricks for Crispy Oven Wings
By Captain Cooking

This buffalo wings recipe delivers genuinely crispy skin and juicy meat straight from your oven—no fryer required. The method relies on baking powder, a wire rack, and high heat working together to render fat and brown the skin the same way hot oil would. Get those three elements right and this buffalo wings recipe comes together in under 45 minutes.
Most oven wings fail because of moisture. Wet skin steams instead of roasts, leaving you with something pale and soft. Every step here targets that problem directly—from the initial dry-down to the optional freezer rest before baking.
Key Takeaways
Why This Buffalo Wings Recipe Works Without a Fryer
The crunch comes from chemistry, not oil. Baking powder is alkaline—when it coats the skin and hits high heat, it raises the surface pH and triggers the Maillard reaction faster than plain skin would. That’s the same browning process that gives a deep-fried wing its golden, crackling crust. Understanding this is what makes a buffalo wings recipe work reliably in a standard home oven.
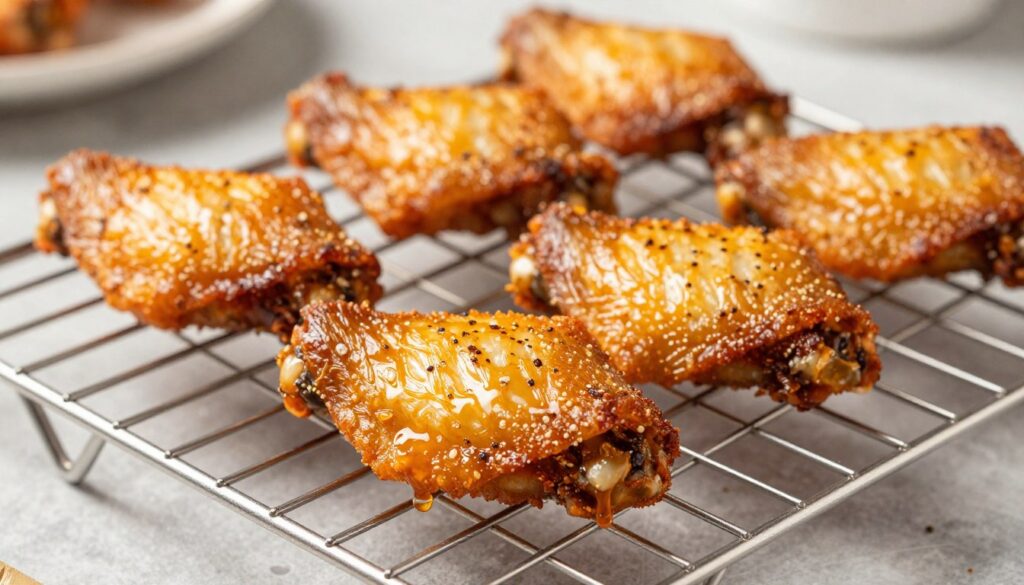
The wire rack is equally important. Wings resting flat on a pan sit in pooled fat and steam from below—you get a crispy top and a soft, greasy underside. A rack keeps every surface exposed to circulating air, so the bottom crisps as well as the top.
The Secret to Crispy Wings Without Frying
Moisture is what kills oven wing texture. Pat each piece thoroughly dry on all sides with paper towels before you do anything else. If the wings came straight from the fridge, let them sit for a few minutes at room temperature first—cold skin pulls condensation from the air and re-wets itself faster than you’d expect.
How Baking Powder Creates Maximum Crispiness
Baking powder does two things. During the pre-bake rest, it draws surface moisture out of the skin. In the oven, the heat-activated compounds create tiny gas bubbles in the coating that expand and set, producing that thin, cracker-like snap when you bite through. Use roughly 1 tablespoon per pound of wings—and if metallic aftertaste is a concern, aluminum-free baking powder works identically.
Don’t swap in baking soda. It’s about three times more potent and leaves a soapy, bitter taste that no sauce covers up. Baking powder contains a buffering acid that keeps the flavor clean. Apply it evenly—thin spots or bare patches won’t crisp the same way as the rest of the wing.
Ingredients for This Buffalo Wings Recipe
The dry coating does most of the heavy lifting on texture. Baking powder creates the crunch; kosher salt draws out additional surface moisture and seasons the skin directly. Smoked paprika adds color and a subtle smokiness that reads as depth without competing with the sauce. Cayenne in the coating means heat is built into the wing itself, not just sitting on top in the sauce layer.

Buffalo Wings
Ingredients
Chicken Wings
- 2 pounds chicken wings drumettes and flats
- 1 tablespoon baking powder
- 1 teaspoon kosher salt
- 1 teaspoon garlic powder
- 1 teaspoon smoked paprika
- ½ teaspoon cayenne pepper
- ½ teaspoon black pepper
Buffalo Sauce
- ½ cup hot sauce Frank’s RedHot recommended
- 4 tablespoons unsalted butter
- ½ teaspoon garlic powder
- 1 teaspoon honey optional
For Serving
- celery sticks
- carrot sticks
- blue cheese dressing or ranch dressing
Instructions
- Preheat oven to 425°F (220°C) and line a baking sheet with foil. Place a wire rack on top.
- Pat the chicken wings completely dry with paper towels.
- In a bowl, mix baking powder, salt, garlic powder, paprika, cayenne, and black pepper.
- Toss wings in the seasoning mixture until evenly coated.
- Arrange wings on the wire rack in a single layer without touching.
- Bake for 20 minutes, then flip the wings and bake another 20 minutes until golden and crispy.
- While the wings bake, melt butter and mix with hot sauce, garlic powder, and honey to make the buffalo sauce.
- Toss hot wings with the sauce until fully coated.
- Serve immediately with celery sticks, carrot sticks, and blue cheese dressing.
Notes
- For extra crispy skin, refrigerate the coated wings 30 minutes before baking.
- Always bake wings on a wire rack to allow airflow.
- Internal chicken temperature should reach 165°F (74°C).
- Adjust cayenne or hot sauce for a milder or spicier flavor.
- Leftover wings can be reheated in the oven at 375°F for 10 minutes to restore crispiness.

Wing size consistency matters more than most people realize. Drumettes and wingettes cook at different rates—if you’ve got a wide size range in your batch, pull the smaller pieces a few minutes early rather than letting them dry out. Whole wings are cheaper and easy to break down yourself: bend the joint back until it loosens, then cut straight through with a sharp knife.
For the sauce, the hot sauce to butter ratio is your main control knob. More hot sauce means tangy and punchy; more butter means rich and mellow. A small amount of honey rounds out the acidity without making the coating taste sweet. Keep the sauce warm while the wings finish baking—cold sauce applied to hot wings creates surface steam and softens the skin fast. If you enjoy mixing your own sauces, this 3-ingredient BBQ sauce follows the same logic and works well as an alternative coating.
Celery and carrot sticks provide a genuine textural contrast between bites. Blue cheese is the traditional pairing for buffalo wings; ranch works if your crowd prefers something milder.
Step-by-Step Instructions for Perfectly Crispy Baked Wings
Preparing Your Chicken Wings
After drying the wings thoroughly, combine the dry coating ingredients in a large bowl and toss until every piece is fully covered—work in batches if needed. Uncoated patches are the most common reason some wings come out soft while others crisp up perfectly. Arrange on a lightly sprayed wire rack in a single layer; the gaps between pieces are what allow hot air to circulate and do its job.
The Freezer Trick for Extra Crispy Skin
Sliding the rack into the freezer for 10–15 minutes after coating pulls residual moisture to the surface and helps the baking powder layer adhere more firmly to the skin. When you take them out, pat off any surface ice crystals before they go into the oven—that thin layer of frost turns straight back to moisture otherwise and undoes the step entirely.
Baking Temperature and Timing
Use 450°F if your oven runs cool, if you’re baking more than 2 pounds, or if your oven loses heat quickly when the door opens. A loaded oven drops in temperature the moment you slide the rack in, and starting hotter compensates for that lag. After flipping at the halfway point, look for skin that appears dry, blistered, and deep golden-brown—not glossy or pale tan. Those visual cues are more reliable than the timer alone.
The two-stage sauce application is what separates this buffalo wings recipe from flat, one-note results. Tossing with half the sauce and returning to broil caramelizes the coating directly onto the skin—it becomes part of the wing rather than sitting on top. The second toss after broiling adds a fresh layer of heat and tang. These pair well next to homemade chicken tenders if you’re building a larger spread.
“The key to crispy baked wings is patience and proper moisture control from start to finish.”
Variations, Storage, and Serving Ideas
The same baking technique works with any sauce—garlic parmesan, honey sriracha, or straight BBQ all follow the same broil-then-toss method. A dry rub finish also works well; the baking powder coating provides enough texture to hold its own without any sauce at all. For a spiced dry-rub version, homemade chili seasoning is a natural fit and makes these practical for meal prep throughout the week.
Leftovers reheat best on a wire rack at 375°F for about 10 minutes—the microwave steams the skin and destroys the texture you worked for. Refrigerate in an airtight container for up to three days. For serving, something light alongside—coleslaw, a green salad, or roasted potatoes—keeps the plate balanced without competing with the wings.
Final Thoughts
A well-executed buffalo wings recipe from the oven comes down to five things: dry wings, baking powder coating, a wire rack, high heat, and sauce applied in two stages. There’s no single step that’s complicated—but skipping any one of them shows up immediately in the texture. Follow the method as written the first time, then dial the sauce heat and coating spices to match your preference.
These hold up whether you’re cooking two pounds on a Tuesday or a full batch for a game day crowd. Once the technique is consistent, the variations are easy—same process, different sauce, reliable results every time.