
Brownies Recipe: The Best Fudgy Homemade Brownies (7 Secrets)
By Captain Cooking
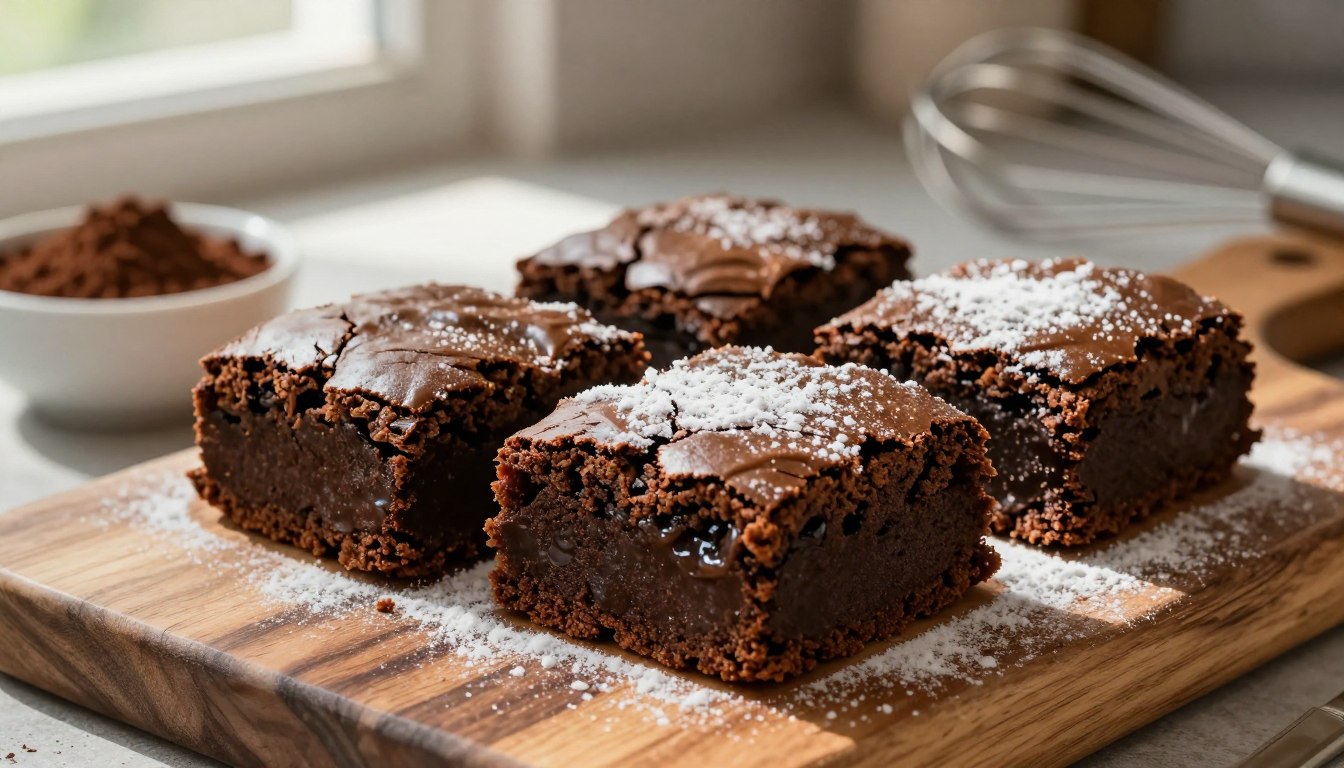
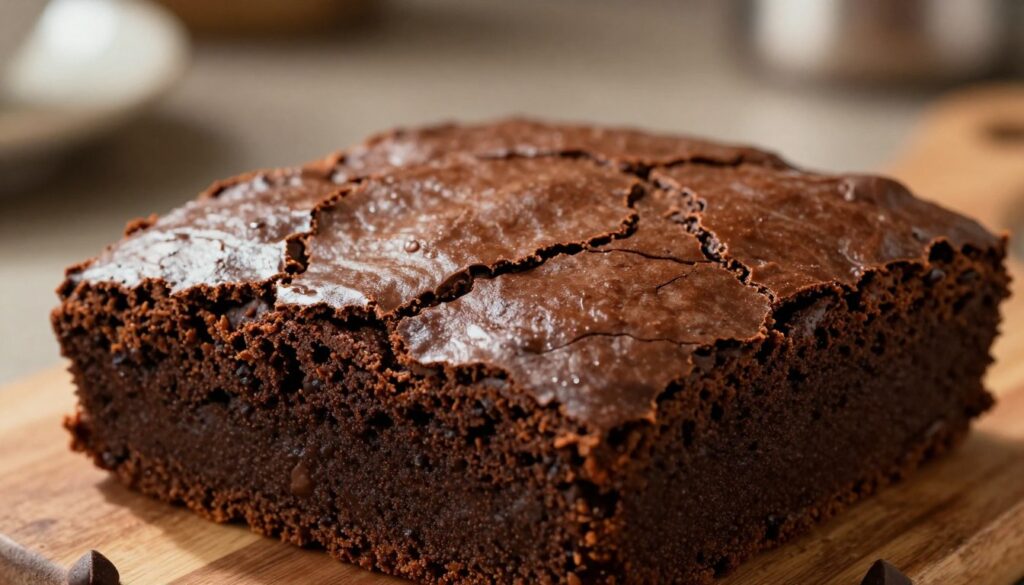
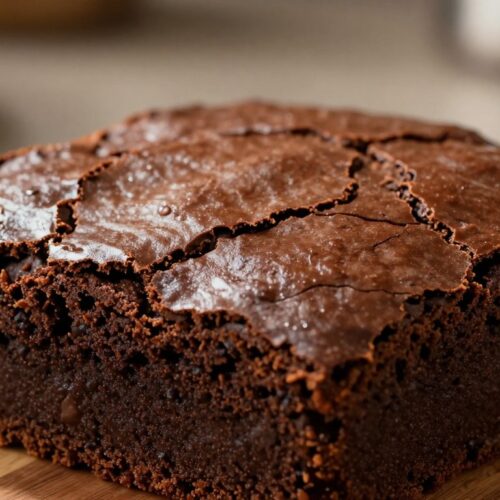
This brownies recipe lives or dies by technique, not by luck. These turn out with a glossy, crackle-top crust and a dense, fudgy center that holds together cleanly when cut — no specialty equipment and no hard-to-find ingredients required. Just the right ratios and a few methods that make all the difference.
Chocolate flavor here comes from cocoa powder, which gives more control over fat and moisture than melted chocolate alone. Whisking eggs and sugar vigorously creates that signature shiny top. Combined with minimal flour and properly measured butter, the result is a batch that stays rich and moist for days.
Key Takeaways
What Makes This Brownies Recipe Different
Most brownie failures come down to two things: too much flour and skipping the proper whisking step. Getting both right is the difference between a dense, fudgy square and something that tastes like dry chocolate cake. Once you understand the role each ingredient plays, the whole process clicks into place.
The Secret to a Shiny, Crackly Top
That glossy, crinkled surface is a sugar chemistry thing. When you mix hot melted butter into your sugar, it begins dissolving the crystals. As the bars bake, those crystals recrystallize at the surface — and that’s what creates the shine.
Whisking technique matters just as much. Whisk eggs with sugar vigorously for 60 to 90 seconds until the mixture turns pale, foamy, and thick. This builds air pockets that help the batter rise and then settle into that crackly finish. Don’t rush this step — it’s the one most people skip.
Pan choice also affects the result. An anodized aluminum pan conducts heat evenly from the start, letting the batter puff up before it settles into that crinkled surface. Glass pans hold heat differently and can cause uneven baking, particularly at the edges.
Why Cocoa Powder Creates the Fudgiest Texture
Cocoa powder gives you better control over moisture and fat than melted chocolate alone. Because it adds no extra cocoa butter, you can dial in that ultra-fudgy center without the batter turning greasy or heavy.
Both natural and Dutch-processed cocoa powder work well here. Natural cocoa (like Hershey’s or Ghirardelli) gives a bold, classic chocolate punch. Dutch-processed has a mellower, deeper flavor — almost Oreo-like. Use whichever you have on hand, but measure carefully. Too much dries out the batter fast.
The Perfect Balance of Ingredients
Fudgy texture comes down to ratios. Keep flour minimal — just enough to prevent the center from collapsing, but not so much that you end up with cakey results. Butter and sugar need to be in balance: too little butter and they dry out, too much and they turn greasy.
Get these proportions right and you’ll have crispy edges, a fudgy center, and that glossy top all at once. Tip the balance even slightly and you’re in cakey or gooey territory. The recipe card below has the exact amounts that hit that sweet spot.
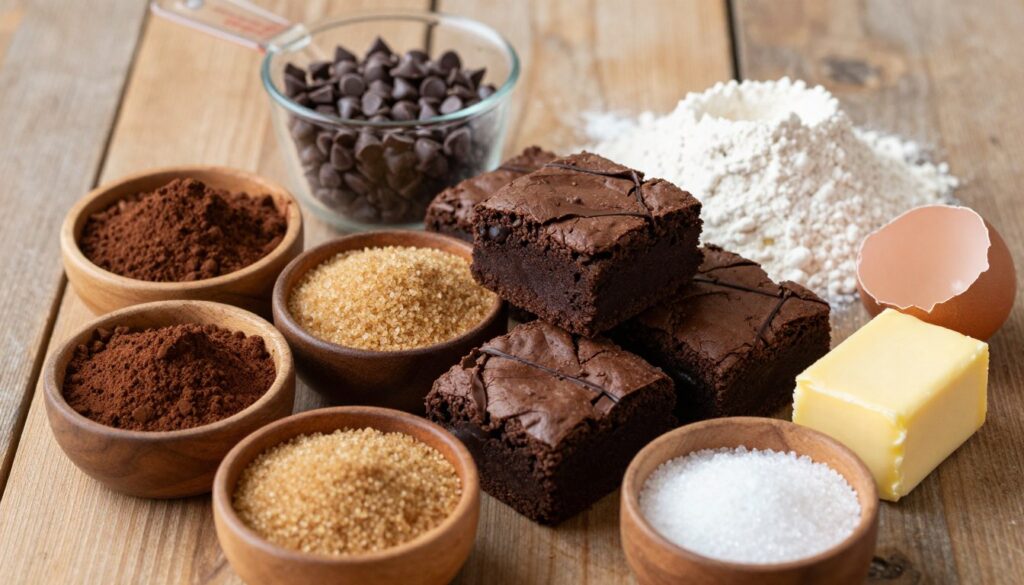
Essential Ingredients for This Brownies Recipe
Every ingredient in a great chocolate brownie has a job. Understanding what each one does makes it easier to measure accurately, substitute when needed, and troubleshoot if something goes wrong. Here’s what you’re working with.
Fudgy Brownies
Ingredients
Core Ingredients
- 10 tablespoons to 1 cup 140–225g unsalted butter
- 1¼ to 2 + cups 250–400g granulated sugar
- ¾ to ⅞ cup 75–90g unsweetened cocoa powder (natural or Dutch-processed)
- 2 to 4 large eggs room temperature
- ½ to ⅔ cup 60–85g all-purpose flour
- 1 teaspoon to 1 tablespoon pure vanilla extract
- ¼ to 1 teaspoon fine sea salt
Optional Add-ins
- ⅔ cup 115g bittersweet chocolate chips or chopped chocolate (70–85% cocoa)
- ⅔ cup 75g walnuts or pecans, roughly chopped
- ⅔ cup 115g chocolate chips
Instructions
- Preheat the oven. Preheat to 350°F (175°C). Line an 8-inch or 9-inch square baking pan with parchment paper, leaving an overhang on two sides for easy removal.
- Melt the butter. In a medium saucepan over medium heat, melt the butter until it just begins to bubble.
- Add sugar and cocoa. Remove from heat and whisk in sugar and cocoa powder until the mixture resembles wet sand. This blooms the cocoa and deepens the chocolate flavor.
- Cool slightly. Let the mixture cool for 3 to 5 minutes so it doesn’t scramble the eggs when added.
- Whisk the eggs. In a separate bowl, whisk eggs with sugar vigorously for 60 to 90 seconds until the mixture becomes foamy, pale, and thick. This step is critical for achieving the shiny crackly top.
- Combine. Pour the warm chocolate mixture into the egg mixture and whisk together for 20 to 30 seconds until glossy and slightly tightened.
- Add vanilla and salt. Stir in vanilla extract and salt.
- Fold in flour. Sift in the flour and stir vigorously for 30 to 45 seconds until the batter is thick, glossy, and free of lumps. Do not overmix.
- Add optional mix-ins. Fold in chocolate chips or nuts if using.
- Pour and spread. Pour batter into the prepared pan and spread evenly with a spatula.
- Bake.
- 💠8-inch pan: bake 20 to 25 minutes
- 💠9-inch pan: bake 30 to 40 minutes
- 💠Brownies are done when the edges are set but the center still looks slightly underdone. A toothpick inserted in the center should come out with moist crumbs, not wet batter.
- Cool completely. Remove from oven and cool in the pan for at least 30 minutes before cutting. Brownies continue cooking as they cool and become fudgier as they rest.
- Slice and serve. Use a hot, dry knife and wipe the blade between each cut for clean slices.
Notes
- Cocoa powder choice: Natural cocoa (Hershey’s, Ghirardelli) gives bold, classic chocolate intensity. Dutch-processed cocoa produces a mellower, smoother, Oreo-like flavor. Both work well.
- Measuring flour: Use the spoon-and-level method or weigh with a kitchen scale. Too much flour produces cakey brownies.
- Eggs at room temperature: Slightly warm eggs incorporate more smoothly into the batter and improve texture.
- Pan material: Anodized aluminum pans conduct heat evenly and help achieve the crinkly top. Avoid glass pans—they heat unevenly.
- Do not overbake: The center should look slightly underdone when you pull them from the oven. They firm up as they cool.
- Cooling is essential: Cutting hot brownies dries them out. Wait the full 30 minutes minimum.
- Storage: Store at room temperature in an airtight container for 2 to 3 days. Refrigerate for up to 2 weeks. Freeze individually wrapped for up to 3 months.
- Make ahead: Brownies actually improve with time—they get richer and fudgier after the first day, making them ideal for baking ahead.
Butter is the foundation — use unsalted so you control the salt level yourself. Sugar does double duty: it sweetens and is directly responsible for that shiny top. Measure it carefully; going over or under will affect both texture and appearance.
For cocoa powder, use the spoon-and-level method or weigh it on a kitchen scale. Scooping directly from the container packs in too much and dries out your batter. Vanilla extract enhances the chocolate rather than competing with it — don’t skip it. Salt is non-negotiable: it balances the sweetness and makes the chocolate flavor pop.
Eggs should be at room temperature before you start. Cold eggs don’t incorporate as smoothly into warm butter, and an uneven batter bakes unevenly. If you forgot to pull them out early, set them in a bowl of warm water for five minutes.
Keep flour on the lower end of the range. The goal is just enough structure to hold together without tipping into cakey territory. If you’re ever unsure, err on the side of less — adjust batch to batch until you find your preferred texture. For an indulgent finish, try drizzling the cooled bars with a warm chocolate ganache for a bakery-style presentation.
Optional mix-ins that work well:
Whenever possible, weigh your ingredients rather than measuring by volume. Cocoa powder and flour in particular are easy to over-measure with cups, and a little too much of either changes the texture noticeably.
How to Make Fudgy Brownies from Scratch
The full ingredient list and step-by-step instructions are in the recipe card above. What follows here covers the technique behind each stage — the things that actually make the difference between good results and great ones.
Preparing Your Batter in One Saucepan
Melt butter in a medium saucepan over medium heat until it’s bubbling and just starting to foam. That slight sizzle tells you it’s hot enough to dissolve the sugar properly when you add it. Pull it off the heat before it browns — you want warm butter, not browned butter.
Add sugar and cocoa powder directly to the hot pan and whisk until it comes together like wet sand. Working in the same pan keeps cleanup minimal and lets the residual heat bloom the cocoa, drawing out more depth of flavor before the eggs go in.

Mixing Techniques for That Glossy Finish
In a separate bowl, whisk eggs with your sugar for a full 60 to 90 seconds. You’re looking for a pale, thick mixture that falls off the whisk in ribbons. This is the step that builds the glossy crust — don’t cut it short.
Stream in the warm chocolate mixture while whisking steadily — 20 to 30 seconds until the batter pulls together and looks glossy. Then stir in sifted flour with a firm hand for about 30 to 45 seconds until no streaks remain and the batter thickens. Vigorous stirring activates some gluten, which is exactly what gives the finished bars their satisfying, chewy bite.
Baking Tips to Prevent Overbaking
Preheat your oven to 350°F. Line your pan with parchment paper, leaving an overhang on two sides — this makes lifting the whole slab out clean and effortless. A metal pan is preferable to glass or ceramic, which hold heat longer and increase the risk of dry, overbaked edges.
Start checking at the 20-minute mark. The edges should look set and pull away slightly from the pan, while the center still has a faint jiggle. Insert a toothpick into the center — moist crumbs are the target, not wet batter and not a completely clean toothpick. Clean means overbaked.
Cutting into warm bars causes them to crumble and dry out at the edges. Let them cool fully in the pan — the center firms up and that dense, chewy texture sets properly. For clean, bakery-style squares, refrigerate for 20 minutes before slicing. For another chocolate treat that comes together with the same pantry ingredients, try this puppy chow recipe.
Storing and Serving Your Brownies
Store cooled bars in an airtight container at room temperature for up to 3 days. The texture tightens and the chocolate flavor deepens over the first 24 hours — so baking a day ahead actually works in your favor. Refrigerate for up to two weeks or freeze individually wrapped squares for up to three months. Thaw at room temperature for about 20 minutes before eating.
Serve plain or alongside a scoop of vanilla ice cream while still slightly warm. A pinch of flaky sea salt on top before baking highlights the chocolate and cuts through the sweetness in exactly the right way. These travel well and slice cleaner after an overnight rest.
To reheat from the refrigerator, microwave individual squares for 10 to 15 seconds. They warm through quickly and regain that soft, fudgy pull without drying out. Avoid reheating the whole pan at once — the edges tend to dry before the center warms. For a savory counterpoint at your next gathering, this spinach artichoke dip pairs well as a starter before dessert.
This brownies recipe gives you a reliable, repeatable result whether you’re baking for the first time or the hundredth. Hot melted butter, vigorous whisking, minimal flour, and pulling the pan out just before they look done — those are the four things that matter most. Get those right and the rest falls into place.